How to Henna Tattoo: A Comprehensive Guide to Temporary Body Art
Henna tattoos, also known as mehndi, have been a cherished form of body art for centuries, particularly in South Asia, the Middle East, and Africa. This temporary skin decoration uses a paste made from the henna plant to create intricate designs that last for one to three weeks. If you’re curious about how to henna tattoo, this comprehensive guide will walk you through everything you need to know, from preparing the skin to aftercare. Whether you’re a beginner or looking to refine your technique, understanding the process is key to achieving beautiful and long-lasting results. Learning how to henna tattoo is a journey that blends artistic expression with cultural appreciation. This guide covers the history, application, and safety aspects of henna.
The History and Cultural Significance of Henna Tattoos
The use of henna dates back to ancient Egypt, where it was used for cosmetic purposes such as staining the hair and nails of pharaohs. Over time, its use spread across various cultures, each adopting unique styles and traditions. In India and Pakistan, mehndi is an integral part of wedding ceremonies, symbolizing good luck and prosperity for the bride. In many African countries, henna is used for celebrations, religious rituals, and simply as a form of personal adornment.
Understanding the cultural significance of henna tattoos is crucial. It’s more than just a temporary tattoo; it’s a symbol of heritage, tradition, and celebration. Respecting these cultural roots is essential when engaging in this art form. Appreciating the history adds depth and meaning to the experience of creating and wearing henna designs.
Essential Materials for Henna Tattoos
Before you start learning how to henna tattoo, gather the necessary materials. Here’s what you’ll need:
- Henna Powder: Opt for natural henna powder, which is typically green-brown in color. Avoid black henna, as it contains harmful chemicals that can cause severe skin reactions.
- Essential Oils: Certain essential oils like lavender, cajeput, or tea tree oil can enhance the stain. These oils help to release the dye from the henna powder.
- Lemon Juice or Warm Water: Use either lemon juice or warm water to mix the henna powder into a paste. Lemon juice can help to darken the stain.
- Sugar: Adding a small amount of sugar to the paste helps it adhere better to the skin.
- Applicator: You can use a cone, syringe, or toothpick to apply the henna paste. Cones are the most common and allow for precise designs.
- Sealant: A mixture of lemon juice and sugar can be used as a sealant to keep the henna paste moist on the skin.
- Gloves: To avoid staining your hands, wear gloves while mixing and applying the henna.
- Paper Towels: Keep paper towels handy for cleaning up any spills or mistakes.
Preparing the Henna Paste
The quality of your henna paste significantly impacts the final result. Here’s how to prepare it:
- Sift the Henna Powder: Sift the henna powder through a fine sieve to remove any clumps and ensure a smooth paste.
- Mix with Essential Oil: In a stainless steel or glass bowl, mix the sifted henna powder with a few drops of your chosen essential oil.
- Add Lemon Juice or Warm Water: Gradually add lemon juice or warm water to the mixture, stirring continuously until you achieve a consistency similar to yogurt.
- Add Sugar: Stir in a small amount of sugar to help the paste adhere to the skin.
- Let it Rest: Cover the bowl with plastic wrap and let the paste rest for at least 4-6 hours, or preferably overnight, in a warm place. This allows the dye to release from the henna powder.
- Check the Consistency: Before use, check the consistency of the paste. It should be smooth and easily flowable. If it’s too thick, add a little more lemon juice or warm water.
Proper preparation of the henna paste is crucial for achieving a dark and long-lasting stain. The resting period is especially important, as it allows the henna to release its dye effectively.
Preparing the Skin for Henna Application
Preparing the skin properly ensures the henna stain adheres well and lasts longer. Follow these steps:
- Clean the Skin: Wash the area where you plan to apply the henna with soap and water. Remove any oils, lotions, or makeup.
- Exfoliate: Gently exfoliate the skin to remove any dead skin cells. This helps the henna penetrate deeper and create a darker stain.
- Avoid Shaving or Waxing: Do not shave or wax the area at least 24 hours before applying henna, as this can make the skin more sensitive.
- Apply Eucalyptus Oil (Optional): Some people apply a small amount of eucalyptus oil to the skin before applying henna, as it can help to open the pores and enhance the stain.
Clean, exfoliated skin is the ideal canvas for a henna tattoo. Avoiding any harsh treatments like shaving or waxing ensures the skin is in the best condition to absorb the dye.
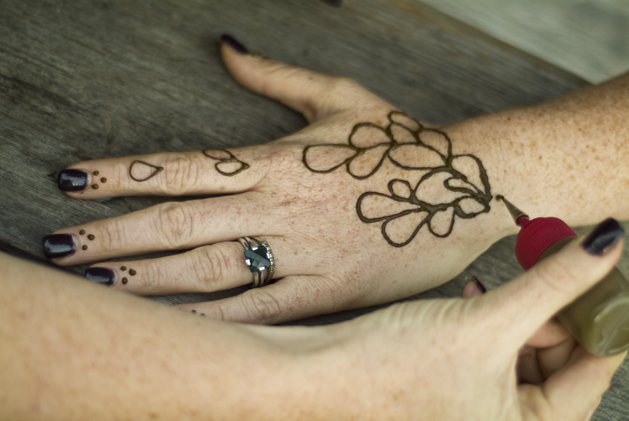
Applying the Henna Tattoo
Now comes the exciting part: applying the henna tattoo. Here’s a step-by-step guide:
- Fill the Applicator: If using a cone, fill it with the prepared henna paste. Make sure to remove any air bubbles to ensure a smooth flow.
- Start with a Simple Design: If you’re a beginner, start with a simple design. Practice on paper first to get a feel for the applicator and the flow of the paste.
- Apply the Paste: Gently squeeze the cone or applicator and apply the henna paste onto the skin, following your chosen design. Maintain a steady hand and consistent pressure.
- Correct Mistakes: If you make a mistake, use a damp cotton swab or paper towel to gently remove the unwanted paste.
- Apply Sealant: Once the design is complete, apply a sealant made of lemon juice and sugar to keep the henna paste moist. This helps the dye to penetrate the skin better.
- Allow it to Dry: Let the henna paste dry completely, which can take anywhere from 30 minutes to a few hours, depending on the humidity and temperature.
Patience is key when applying a henna tattoo. A steady hand and careful application will result in a beautiful and intricate design. [See also: Henna Tattoo Design Ideas]
Aftercare for a Long-Lasting Henna Tattoo
Proper aftercare is essential for achieving a dark and long-lasting henna tattoo. Follow these tips:
- Keep the Paste on for as Long as Possible: The longer the henna paste stays on the skin, the darker the stain will be. Aim to keep it on for at least 2-6 hours, or even overnight.
- Avoid Water: Avoid washing the area for at least 2-3 hours after removing the paste. Water can prevent the dye from fully oxidizing and darkening.
- Apply Natural Oils: After removing the paste, apply natural oils like coconut oil, olive oil, or shea butter to moisturize the skin and protect the stain.
- Avoid Soaps and Harsh Chemicals: Avoid using soaps, detergents, or harsh chemicals on the hennaed area, as they can fade the stain.
- Stay Warm: Keep the area warm, as heat helps to darken the stain. You can wrap the area with a warm cloth or sit in a warm room.
- Avoid Excessive Sweating: Excessive sweating can also fade the stain, so try to avoid strenuous activities that cause you to sweat heavily.
Proper aftercare is just as important as the application process. By following these tips, you can ensure your henna tattoo lasts longer and looks its best. [See also: Natural Skin Care Tips]
Safety Precautions When Using Henna
While natural henna is generally safe, it’s crucial to be aware of potential risks and take necessary precautions:
- Avoid Black Henna: Black henna contains a chemical dye called paraphenylenediamine (PPD), which can cause severe allergic reactions, blistering, and permanent scarring. Always use natural henna, which is typically green-brown in color.
- Patch Test: Before applying henna to a large area, perform a patch test on a small area of skin to check for any allergic reactions.
- Use High-Quality Henna: Ensure you are using high-quality, natural henna powder. Purchase from reputable suppliers to avoid adulterated products.
- Consult a Professional: If you have sensitive skin or a history of allergic reactions, consult a professional henna artist or dermatologist before getting a henna tattoo.
- Be Mindful of Hygiene: Ensure that all tools and equipment are clean and sanitized to prevent infections.
Your health and safety should always be a priority. By avoiding black henna and taking the necessary precautions, you can enjoy the beauty of henna tattoos without risking your well-being. [See also: Allergic Reactions to Cosmetics]
Henna Tattoo Designs and Inspiration
The possibilities for henna tattoo designs are endless. Here are some popular styles and ideas:
- Indian Mehndi: Characterized by intricate patterns, floral motifs, and paisley designs, often used in wedding ceremonies.
- Arabic Henna: Features bolder and more geometric designs, often incorporating floral and vine elements.
- African Henna: Known for its simple, geometric patterns and bold lines, often used for tribal markings and celebrations.
- Contemporary Henna: Incorporates modern elements and personalized designs, such as names, quotes, or abstract patterns.
Whether you prefer traditional or contemporary designs, henna tattoos offer a unique way to express your individuality and creativity. [See also: Body Art Trends]
Troubleshooting Common Henna Problems
Even with careful preparation and application, you may encounter some common problems. Here are some solutions:
- Faint Stain: This could be due to poor quality henna powder, insufficient dye release, or inadequate aftercare. Ensure you are using high-quality henna, allowing it to rest for the appropriate time, and following the aftercare tips.
- Uneven Application: This can be caused by an inconsistent flow of paste from the applicator or uneven pressure. Practice on paper to improve your technique and ensure a smooth flow.
- Allergic Reaction: If you experience itching, redness, or blistering, discontinue use immediately and consult a doctor. You may be allergic to an ingredient in the henna paste.
- Paste Cracking: This can happen if the paste dries out too quickly. Apply a sealant of lemon juice and sugar to keep the paste moist.
Addressing these common issues can help you achieve better results and avoid potential problems. [See also: Skin Irritation Remedies]
Conclusion: Embracing the Art of How to Henna Tattoo
Learning how to henna tattoo is a rewarding experience that combines artistic expression with cultural appreciation. By understanding the history, preparing the materials, applying the henna, and following the aftercare tips, you can create beautiful and long-lasting temporary body art. Remember to prioritize safety and avoid black henna to protect your skin. Whether you’re creating intricate designs for a special occasion or simply experimenting with body art, henna tattoos offer a unique and meaningful way to adorn yourself. So, gather your materials, unleash your creativity, and embrace the art of how to henna tattoo.
