Better Homes and Gardens 8-Cube Organizer Assembly: Your Comprehensive Guide (with PDF Instructions)
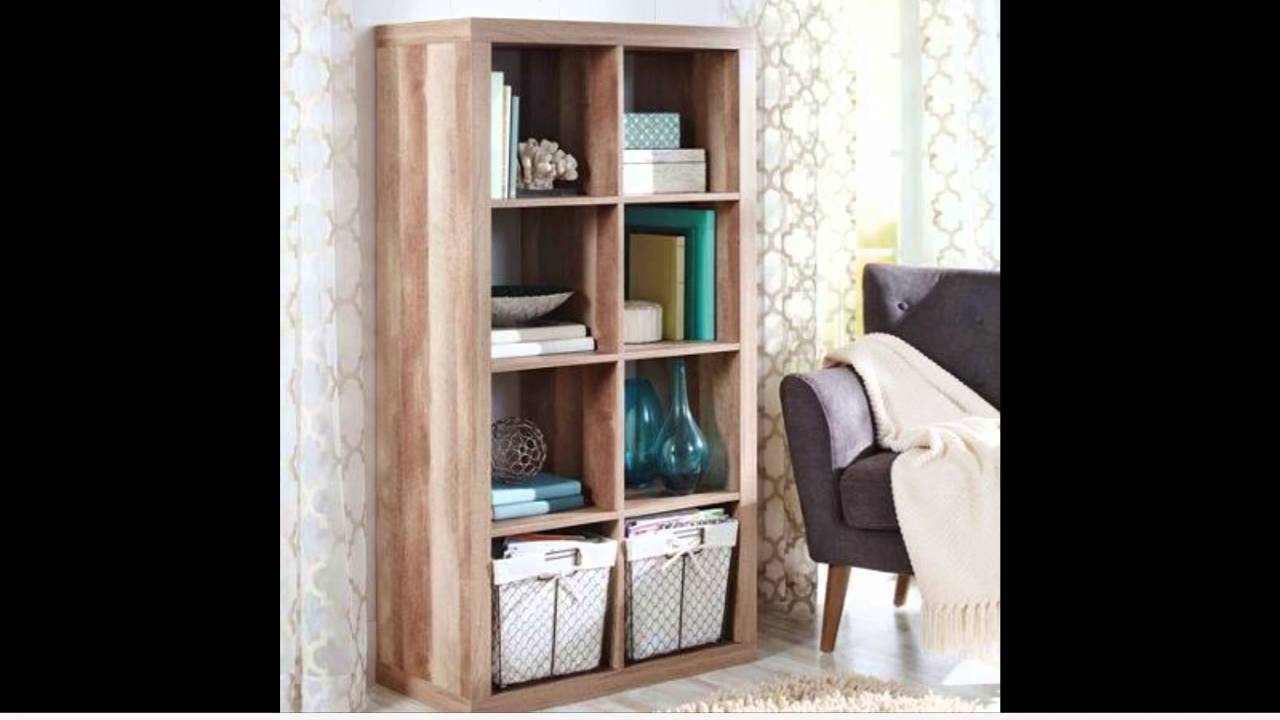
The Better Homes and Gardens 8-Cube Organizer is a popular storage solution, known for its versatility and affordability. Whether you’re organizing your living room, bedroom, or home office, this organizer offers ample space and a clean aesthetic. However, assembling it can sometimes feel like a daunting task. This guide provides comprehensive Better Homes and Gardens 8-cube organizer assembly instructions, including where to find the Better Homes and Gardens 8 cube organizer assembly instructions PDF, ensuring a smooth and stress-free setup.
Understanding the Popularity of the 8-Cube Organizer
Before diving into the assembly process, let’s understand why this particular organizer is so popular. The Better Homes and Gardens brand is synonymous with quality and style, offering home solutions that are both functional and visually appealing. The 8-Cube Organizer is a prime example of this, providing ample storage while seamlessly blending into various decor styles. Its modular design allows for customization, making it suitable for various spaces and storage needs. The availability of a Better Homes and Gardens 8 cube organizer assembly instructions PDF further enhances its appeal, ensuring that even those with minimal DIY experience can successfully assemble the unit.
Finding the Better Homes and Gardens 8 Cube Organizer Assembly Instructions PDF
The first step in assembling your 8-Cube Organizer is locating the assembly instructions. Fortunately, finding the Better Homes and Gardens 8 cube organizer assembly instructions PDF is relatively straightforward. Here are a few places to look:
- The Product Packaging: The physical instructions are usually included within the product box. Before discarding the packaging, double-check for the instruction booklet.
- Walmart’s Website: Since the Better Homes and Gardens line is primarily sold at Walmart, their website is an excellent resource. Search for the specific 8-Cube Organizer model you purchased. On the product page, look for a section labeled “Specifications,” “Documents,” or “Assembly Instructions.” You should find a link to download the Better Homes and Gardens 8 cube organizer assembly instructions PDF.
- Better Homes and Gardens Website: While not as readily apparent, the official Better Homes and Gardens website may also host the PDF instructions. Use the search function on their site to locate the 8-Cube Organizer and look for a downloadable manual.
- Online Forums and Communities: DIY forums and home improvement communities often share resources and advice. A quick search for “Better Homes and Gardens 8 cube organizer assembly instructions PDF” on these platforms might lead you to a user who has uploaded the instructions.
- Directly from Customer Service: If all else fails, contact Walmart’s or Better Homes and Gardens’ customer service. They should be able to provide you with a digital copy of the instructions.
Essential Tools for Assembly
Before you start, gather the necessary tools. Having the right tools will make the assembly process much smoother and more efficient. Here’s a list of essentials:
- Screwdriver: A Phillips head screwdriver is a must. A power screwdriver with adjustable torque settings can speed up the process, but be careful not to overtighten the screws.
- Hammer: A rubber mallet is ideal for gently tapping pieces into place without damaging the finish.
- Level: Ensure the organizer is level once assembled. This is especially important if you plan to place it on an uneven surface.
- Measuring Tape: While not always necessary, a measuring tape can be helpful for ensuring proper alignment.
- Safety Glasses: Protect your eyes from dust and debris.
Step-by-Step Assembly Guide (Using the PDF Instructions)
This section provides a general overview of the assembly process. Always refer to the official Better Homes and Gardens 8 cube organizer assembly instructions PDF for detailed steps and diagrams specific to your model.
Step 1: Unboxing and Inventory
Carefully unpack all the components and compare them against the parts list in the instruction manual. Identify each part and lay them out in an organized manner. This will save you time and frustration later on. Ensure you have all the necessary hardware, such as screws, dowels, and cam locks. If any parts are missing or damaged, contact customer service immediately.
Step 2: Assembling the Base
The base typically consists of the bottom panel and the side panels. Connect these pieces using the provided hardware. Pay close attention to the orientation of the panels, ensuring that any pre-drilled holes are aligned correctly. The Better Homes and Gardens 8 cube organizer assembly instructions will illustrate this clearly.
Step 3: Installing the Dividers
The dividers create the individual cube compartments. Insert the dividers into the slots or attach them using screws or cam locks, as specified in the instructions. Ensure that the dividers are evenly spaced and securely fastened. Refer to the Better Homes and Gardens 8 cube organizer assembly instructions PDF for the precise placement of each divider.
Step 4: Attaching the Top Panel
Once the dividers are in place, attach the top panel. This panel provides structural support and completes the main frame of the organizer. Secure the top panel using screws or cam locks, ensuring a tight and flush fit.
Step 5: Adding the Back Panel (Optional)
Some models include a back panel, which adds stability and prevents items from falling out the back. Attach the back panel using nails or screws. Ensure that the back panel is aligned properly and securely fastened. The Better Homes and Gardens 8 cube organizer assembly instructions PDF will detail the proper attachment method.
Step 6: Final Touches and Inspection
Once the main assembly is complete, inspect the organizer for any loose screws or misaligned panels. Tighten any loose hardware and make any necessary adjustments. Use a level to ensure the organizer is sitting evenly. Clean the surface with a damp cloth to remove any dust or debris.
Tips for a Smooth Assembly Process
- Read the Instructions Carefully: This cannot be stressed enough. Before you even open the box, download and review the Better Homes and Gardens 8 cube organizer assembly instructions PDF.
- Work in a Well-Lit Area: Adequate lighting will make it easier to see the parts and follow the instructions.
- Protect Your Work Surface: Place a drop cloth or cardboard underneath the organizer to prevent scratches and damage to your floor.
- Don’t Overtighten Screws: Overtightening can strip the screw heads or damage the particleboard.
- Take Breaks: If you’re feeling frustrated, take a break and come back to it later.
- Enlist Help: If possible, ask a friend or family member to assist you with the assembly. Having an extra set of hands can make the process much easier.
Troubleshooting Common Assembly Issues
Even with the Better Homes and Gardens 8 cube organizer assembly instructions PDF, you might encounter some common issues. Here’s how to troubleshoot them:
- Missing Parts: Contact customer service immediately to request replacement parts.
- Misaligned Panels: Loosen the screws and try to realign the panels. If necessary, use a rubber mallet to gently tap the panels into place.
- Stripped Screws: Use a slightly larger screw or fill the hole with wood glue and a toothpick before reinserting the screw.
- Wobbly Organizer: Check that all the screws are tightened and that the organizer is sitting on a level surface.
Customizing Your 8-Cube Organizer
Once your Better Homes and Gardens 8-Cube Organizer is assembled, the fun begins! Here are some ideas for customizing it to suit your needs and style:
- Fabric Bins: Add fabric bins to conceal clutter and create a more organized look.
- Wire Baskets: Use wire baskets for storing items that need ventilation, such as linens or toys.
- Decorative Accents: Personalize your organizer with decorative accents, such as picture frames, plants, or candles.
- Labels: Label the bins or shelves to easily identify the contents.
- Bookshelves: Use it as a bookshelf, displaying your favorite reads and adding a touch of personality.
Conclusion
Assembling the Better Homes and Gardens 8-Cube Organizer can be a straightforward process with the right tools, a clear understanding of the Better Homes and Gardens 8 cube organizer assembly instructions (ideally from the Better Homes and Gardens 8 cube organizer assembly instructions PDF), and a little patience. By following the steps outlined in this guide, you can quickly and efficiently assemble your organizer and enjoy its versatile storage capabilities. Remember to always prioritize safety and refer to the official instructions for the most accurate guidance. Happy organizing!
[See also: Organizing Your Home on a Budget]
[See also: DIY Home Improvement Projects for Beginners]
[See also: Choosing the Right Storage Solutions for Your Space]
